


Everest Fernandez
Everest Fernandez is a passionate grower, writer and online educator living in southern France. He grows primarily to supply his home kitchen and loves to cultivate exotic, hard-to-find herbs and vegetables. A seasoned prepper and liberty lover, Everest believes that local, sustainable food production is the foundation of building resilient communities.
Talk to any experienced indoor gardener and they’ll tell you the same story: the roots are where it’s at. Normally hidden well away under the soil or growing media, the health of your root zone ultimately determines the health and productivity of the whole plant. And the key to maintaining a healthy root zone? The monitoring and management of three key plant health factors: pH, EC and temperature.
Article contents - click on the titles below to visit the section you need
- Introduction: pH, EC and temperature
- pH and pH testing options
- EC (Electrical Conductivity)
- Temperature testing options
- Other things to test?
Introduction: pH, EC and temperature
The pH (acidity/alkalinity) of the root zone directly affects the availability of key mineral elements. Too high and you’ll effectively lock out important essential elements like iron. Too low and you risk depriving your plants of crucial macro elements like phosphorus.
The EC (electrical conductivity/nutrient concentration) of the root zone affects the rate at which water and some nutrients are taken up by the plant. If your EC is too high, this will literally suck the water out of your plants. Too low and your plants will be deprived of the nutrients they need for healthy growth and bloom.
Root zone temperature is another super-important factor that drives the rate of a wide array of plant metabolic functions. If the roots get too cold, the plant can become stunted as water and nutrient uptake slows to a crawl. If the roots become too hot, this can cause wilting, stem elongation, desiccation and nutrient burn.
That's why, whether you’re growing in soil or hydroponics (soil-less), the ability to monitor and manage pH, EC, and temperature in the root zone is the key to your success.
Soil growers need to be aware of this right from the get-go by making sure that they choose a soil mix that is suitably light in nutrition for propagating young plants. If they use a mix that is too rich, an excessively high root zone EC could prevent their plants from even getting out of the starting blocks. Growing media should ideally be stored at around 20 °C (68 °F) so that it’s at a suitable temperature for the roots straight out of the bag; otherwise, leave your filled pots to acclimatise for several hours before transplanting.
Hydroponic growers must pay particular attention to pH, EC and temperature too - crucially when mixing up batches of nutrient solution. Ongoing monitoring will also be necessary, especially if the nutrient solution is recirculated, as is the case with active hydroponic systems such as the Nutrient Film Technique (NFT), Flood and Drain and Deep Water Culture (DWC). When the nutrient solution passes over the roots, plants selectively take up mineral ions such as calcium (Ca++) and nitrate (NO3-) while exuding phenolic acids, amino acids, carbohydrates, hydrogen ions and hydroxide ions back into the nutrient solution. This interaction changes the composition of the nutrient solution in different ways, sometimes altering the pH and EC in particular.
In this post, I'll be taking a look at the different testing options for pH, EC and root zone temperature. This will help you figure out the best choice for you when it comes to measuring these parameters in your own growing setup.
pH and pH testing options
Healthy plants are the result of the continual and consistent availability of water and dissolved nutrients. When we say a nutrient is 'available', what we really mean is that it is fully dissolved and in solution, ready to be taken up by your plants.
By now, you're probably familiar with pH as a measure of the acidity and alkalinity of a solution. The pH of the root zone can greatly affect the stability and solubility of the various cations (positive ions) and anions (negative ions) in the nutrient solution. Remember, if a particular element is not dissolved, it’s essentially locked out, making it unavailable to the plant.
Some elements are more soluble at a lower (acidic) pH, whereas others are more soluble at a higher (alkaline) pH. Fortunately, there’s a 'sweet spot' or 'Goldilock’s zone' between pH 5.8 – 6.5 for hydroponics and 6.5 - 7.0 for soil; this is where all the elements easily remain dissolved - and therefore available. Sure, some species like blueberries prefer more acidic conditions but the above ranges will serve most indoor growing applications well.
The easiest way to maintain control over root zone pH is to measure (and adjust, if necessary) the pH of the irrigation water or feed solution. Hydroponic growers usually aim to keep their nutrient solution pH between 5.8 and 6.5 and test the pH of their nutrient solutions daily to ensure that these fall within this range. Soil growers can also test the pH of the water or feed solution they are giving to their plants to make sure it falls within their preferred range.
Before attempting to test the pH of your nutrient solution, be sure that it is thoroughly and completely mixed. It should be the last thing you do after adding all your nutrients and any additives. Either stir vigorously with a mixing stick or use a small pump in your reservoir to recirculate the solution.
pH testing strips
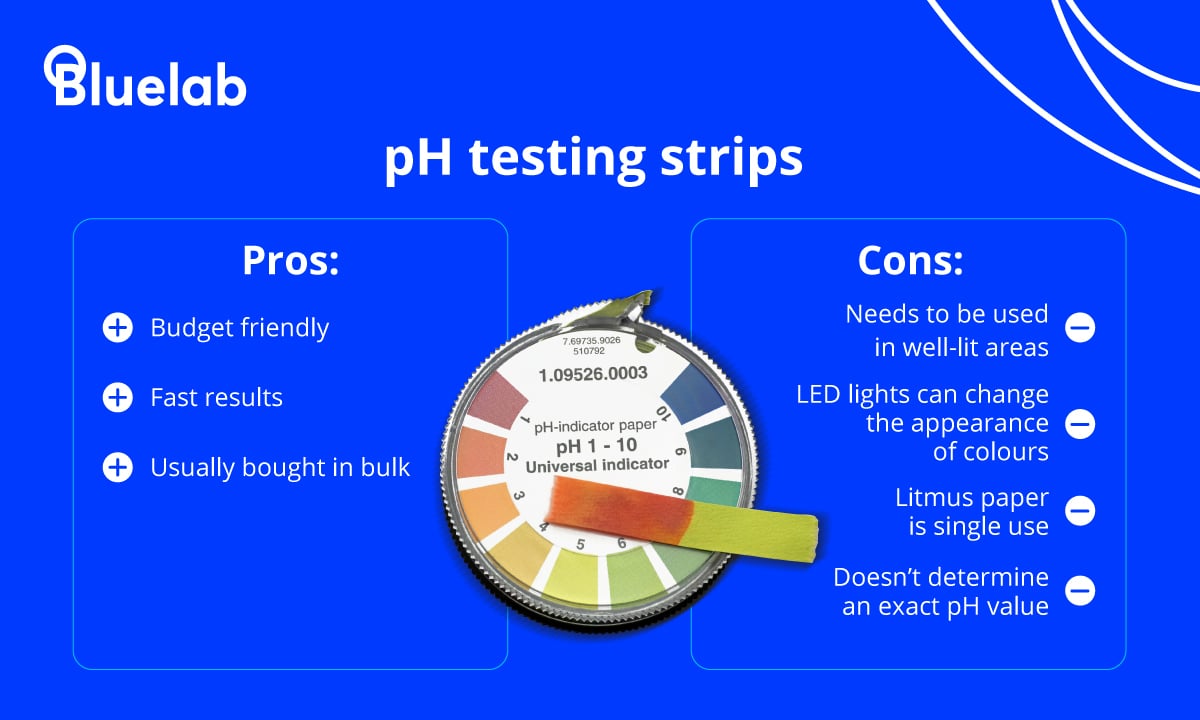
The cheapest option for testing pH, litmus paper is available on sheets or rolls and it helps you keep your nutrient solution pH on track. Simply take a small sample of your nutrient solution in a small, clean container, tear off a section of the pH testing strip and dip it for a few seconds into the nutrient solution.
The litmus paper will immediately change colour, indicating the pH of the nutrient solution, so make sure that you perform the test in a place where light quality is good. Keep in mind that high-pressure sodium (HPS) and some LED grow lights can alter the appearance of some colours. Your pH testing strips should come with a colour chart to help you match your litmus paper test result with the corresponding pH value.
Most of the litmus paper products available online are for general purpose use and, as such, are intended to measure the widest practical range of pH (0 – 14). However, a better option for gardeners is litmus paper pH testing strips designed for greater accuracy over a smaller range, say from 4.5 – 9, as we’re really not concerned with measuring pH outside of this range. Hydrion offers an inexpensive 4.5-metre roll of pH testing strip specifically designed to test pH between 5.5 and 8.0.
Remember, litmus paper is designed for single use. If you need to re-test, use a fresh piece of pH testing strip. Liquid pH testing kits are also widely available. You simply add around four or five drops of test indicator fluid to a small test tube of nutrient solution and give it a shake. The solution then changes colour and you match the result against a colour chart in the same way as litmus paper kits. Hold the test tube against a white piece of paper and try to be consistent between tests in terms of the volume of the test solution and the number of indicator fluid drops added each time.
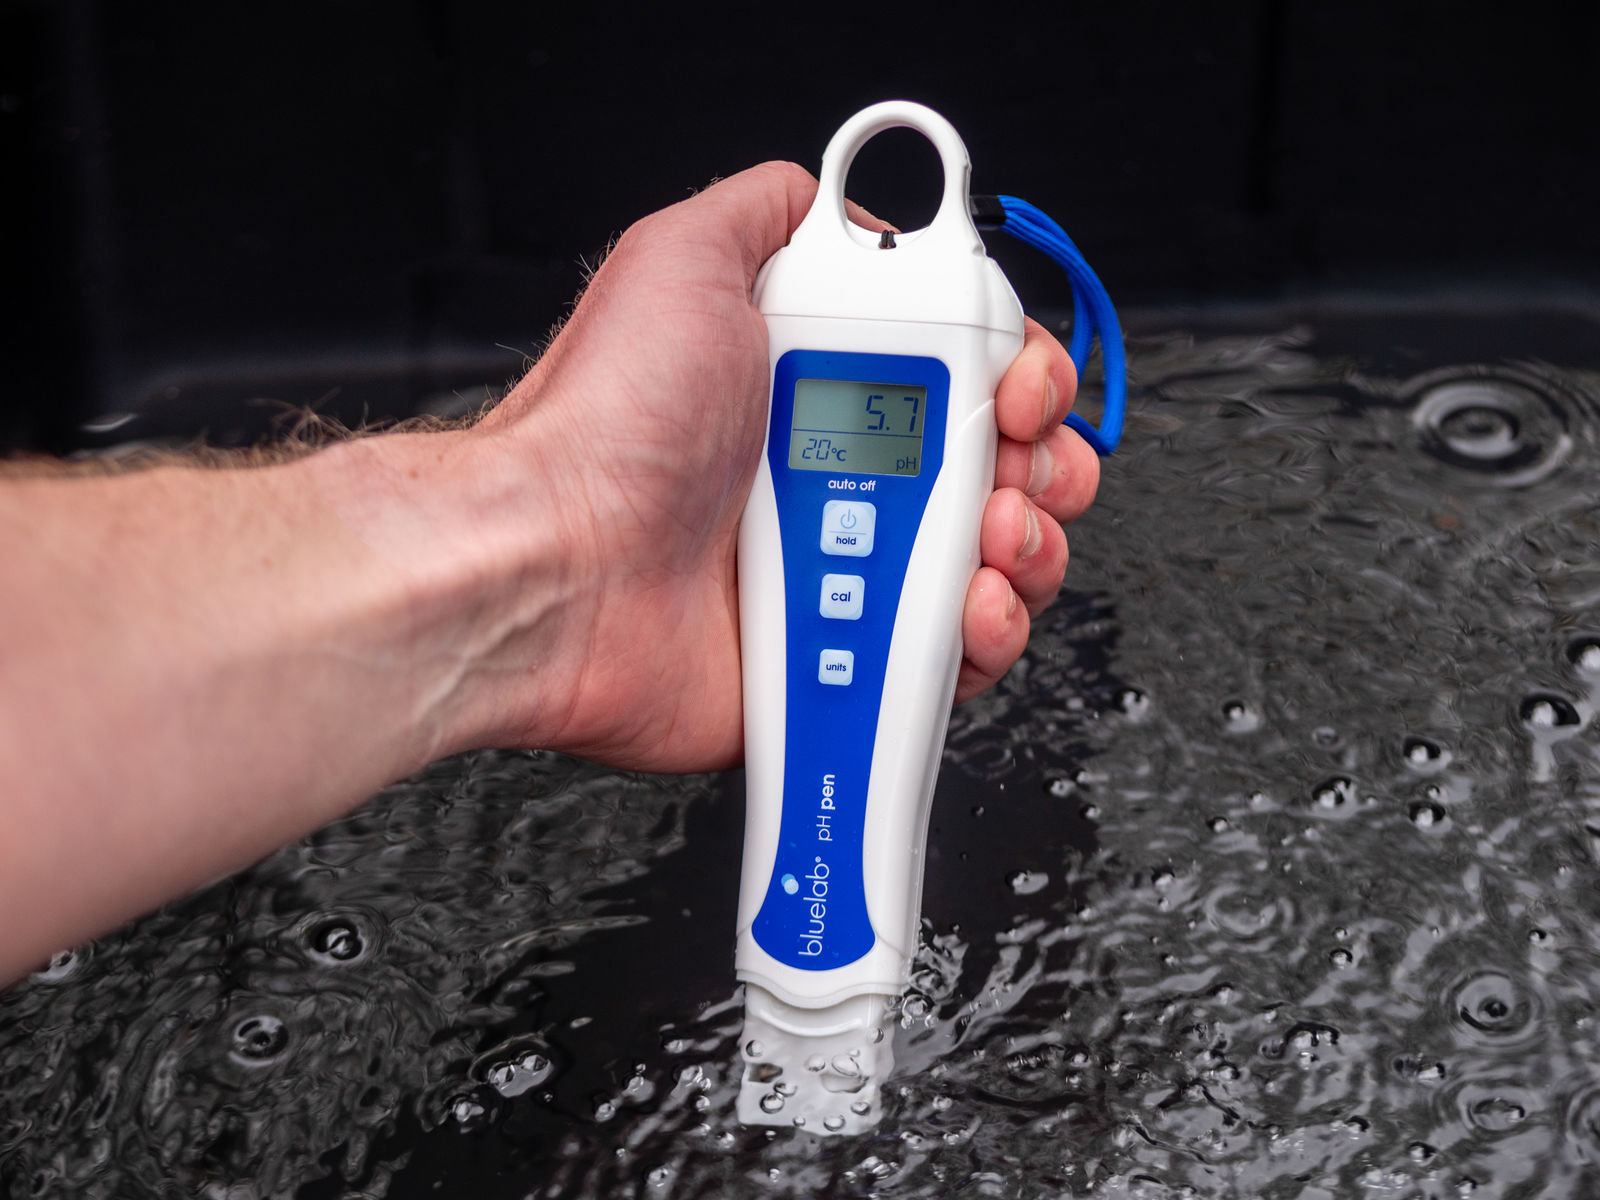
Handheld pH meters
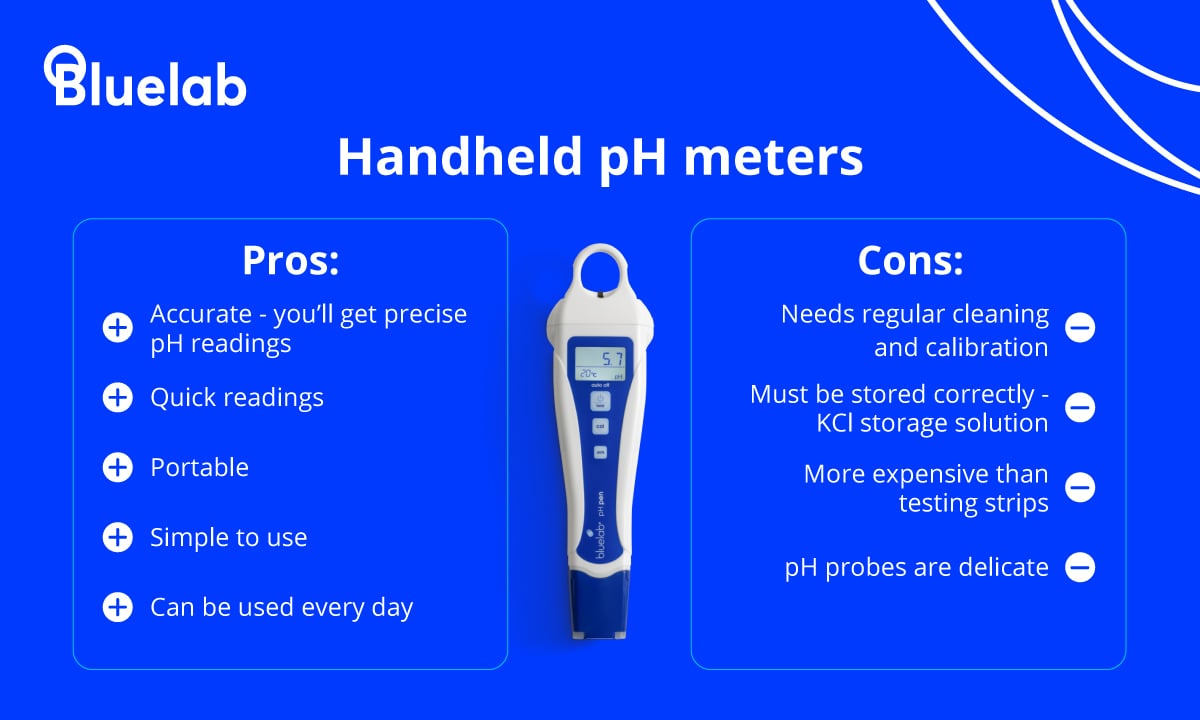
Handheld meters offer a faster, more convenient and more accurate option. You simply dip the meter’s probe so that it is submerged in the nutrient solution and it displays the pH almost instantaneously. It’s a good idea to leave the probe in the solution for several seconds, using a gentle swirling motion, especially if you see any small fluctuations.
When you're done with your measurement, wash the probe in tap water and keep it wet when not in use by either filling the meter’s cap with KCl storage solution (usually provided with the meter) or storing the probe upright in a small container of the storage solution. This maximises the working life of your probe - it should never be allowed to dry out.
The cheapest pH 'pen-style' probes start at around US$15 but they don’t offer the highest accuracy and are seldom waterproof, meaning that one slip of your wet fingers over the reservoir and it’s effectively game over for the meter.
On the other hand, you can spend more for a premium waterproof meter with higher accuracy, such as the Bluelab pH Pen - this will also display the nutrient solution temperature on the backlit LCD screen. However, the pH probe itself isn’t replaceable, so it’s especially important to take very good care of it. Some pH meters offer a read-out to two decimal places (eg pH 6.51 instead of 6.5) but this level of accuracy is overkill for most gardeners.
Ultimately, if it suits your budget, you can choose an all-in-one meter that measures all three plant health factors at once - pH, temperature and EC - like the Bluelab Combo Meter. Sure, it’s a bigger initial investment, but the probes are replaceable and, as such, it can keep going as long as you keep growing!
Measuring root zone pH directly
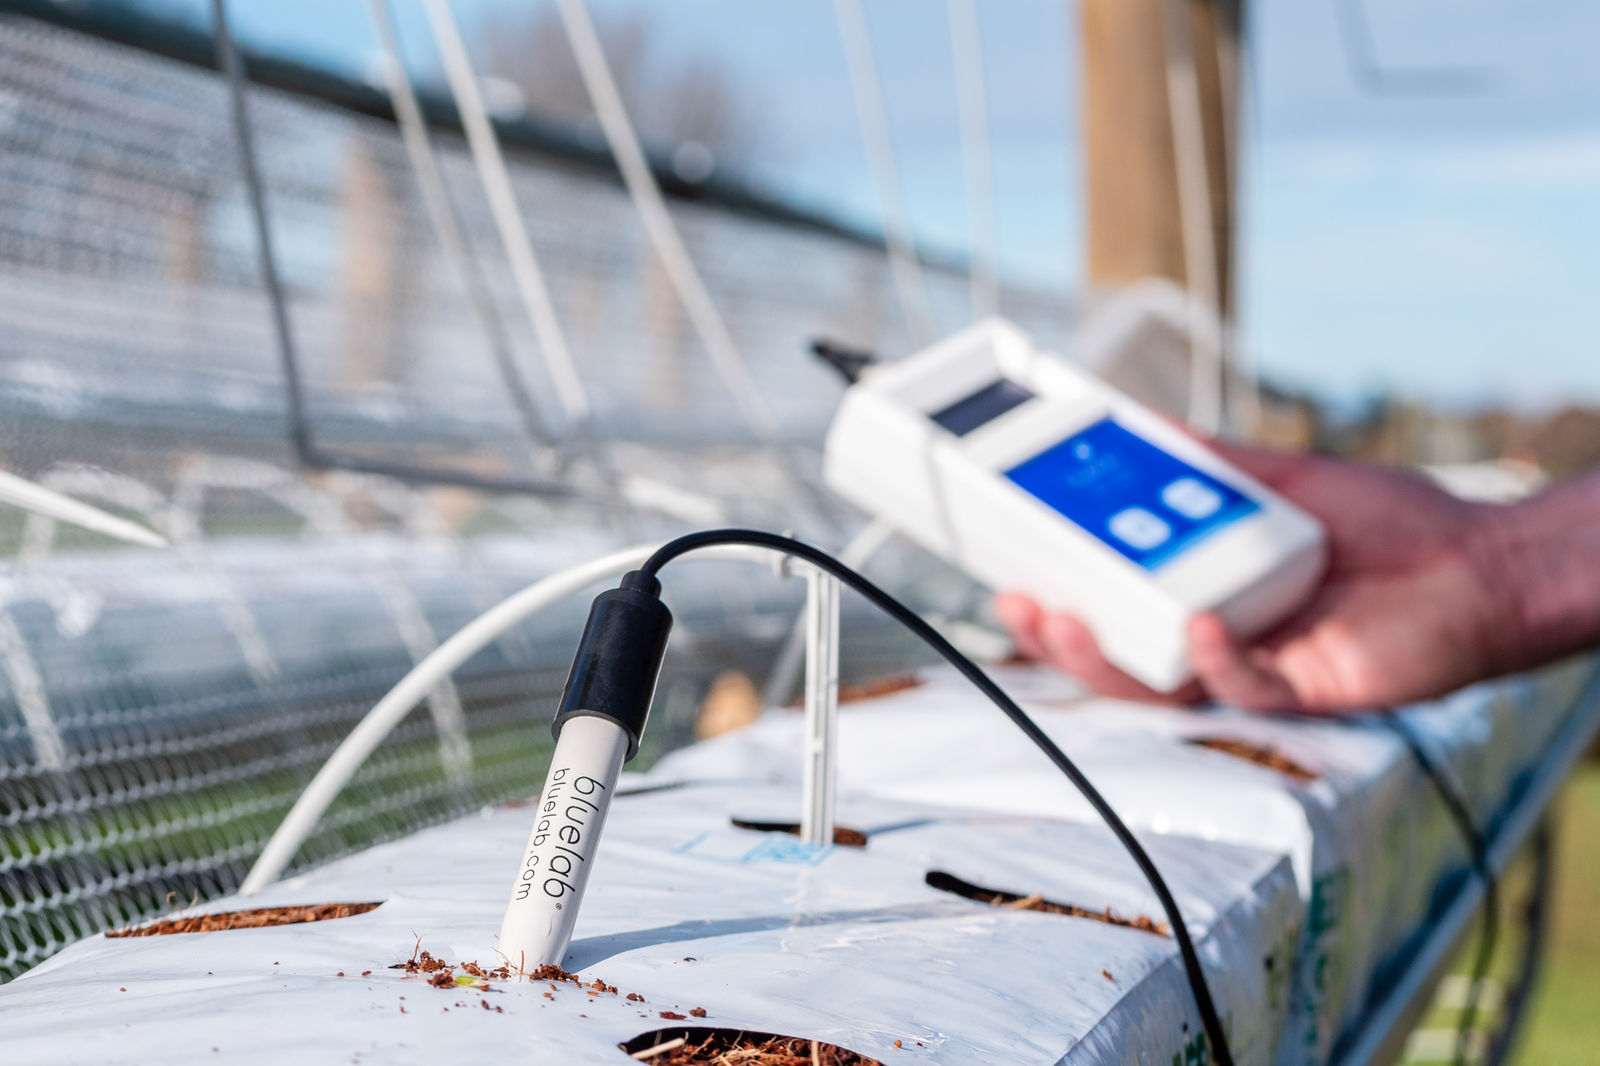
Of course, it’s one thing to measure the pH of your nutrient solution, but what’s really going on in the root zone itself? For this, you’ll need a specialist pH pen like the Bluelab Soil pH Pen. You can use this pH meter in a variety of substrates, including soil-less growing media such as coco coir or rockwool. You simply insert the meter directly into the substrate, making sure that the probe is at least a few inches beneath the surface, and you’ll get an accurate reading of the pH in the root zone itself.
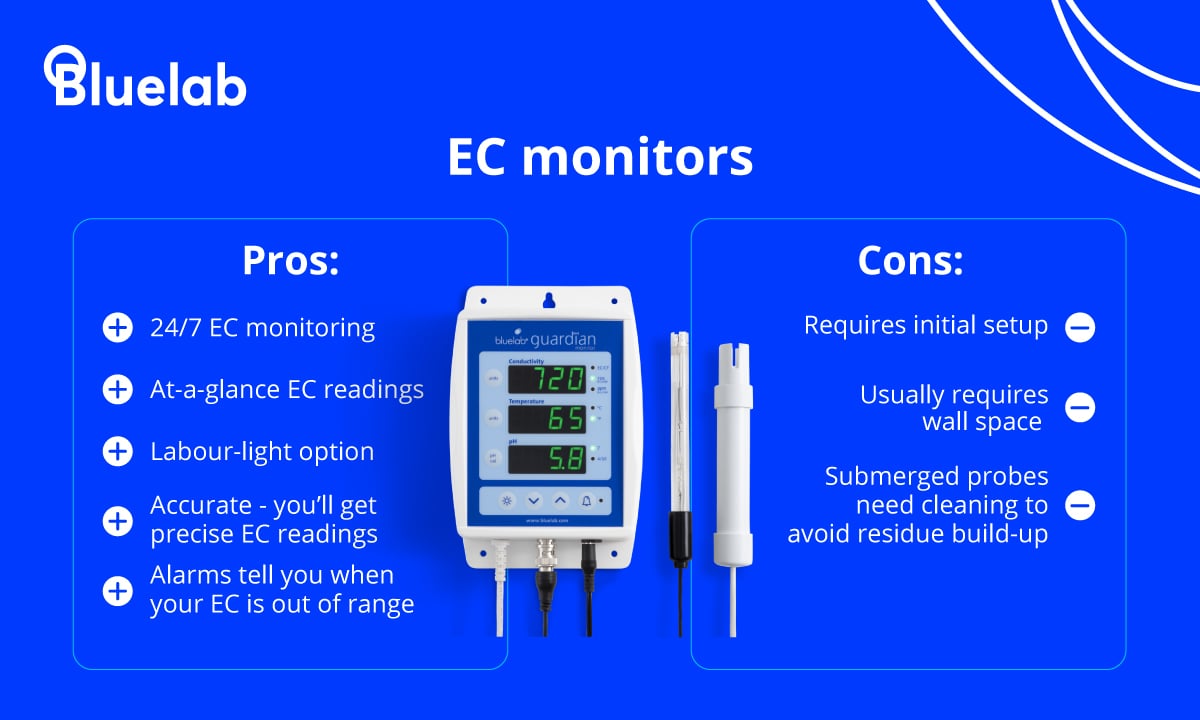
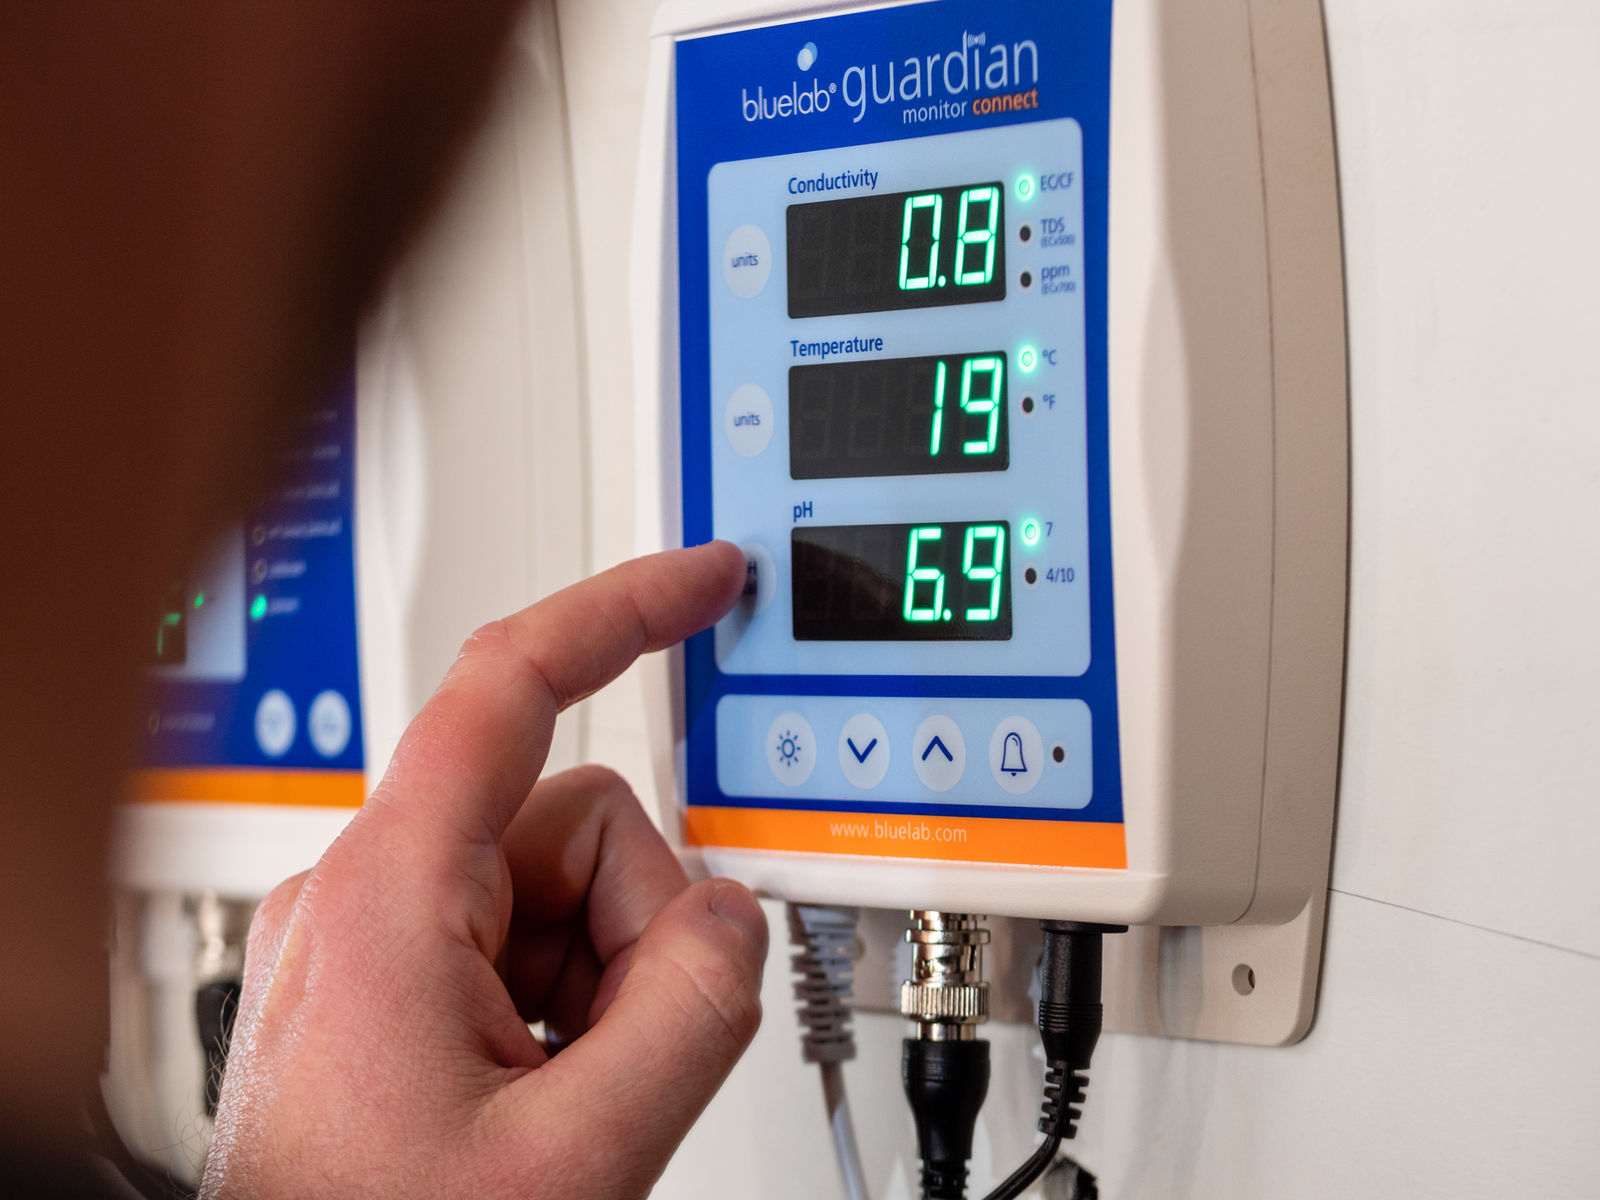
pH monitors
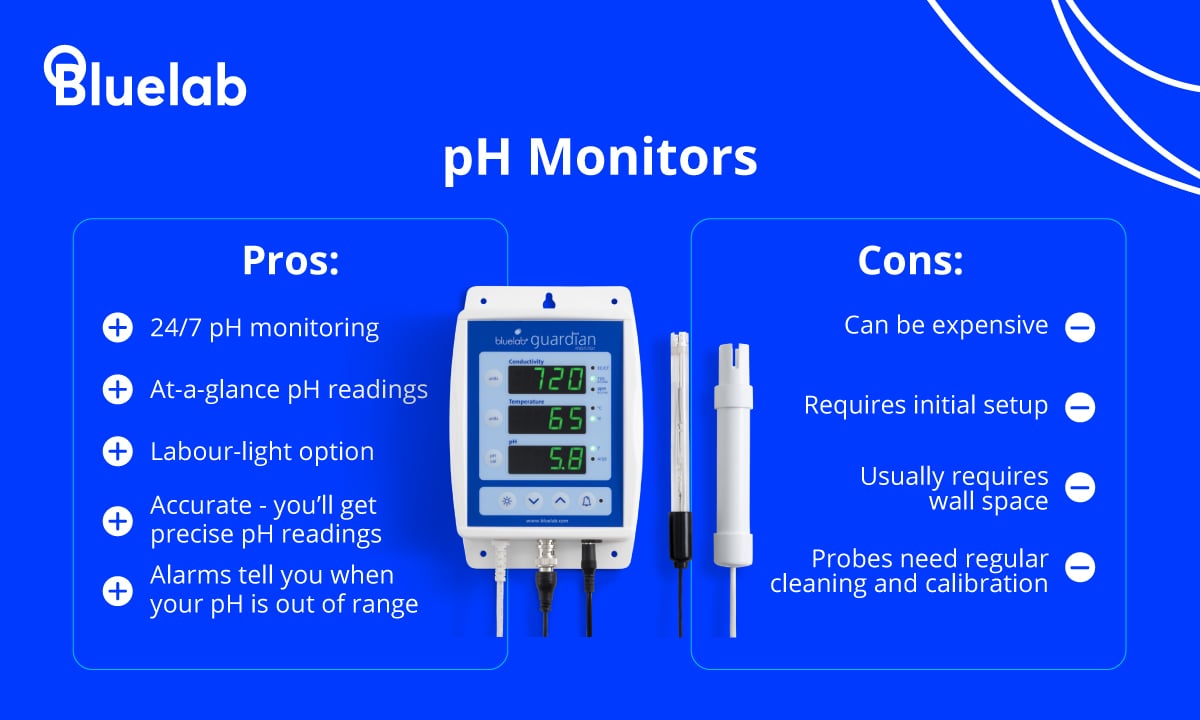
If all this talk of removing caps, dipping, stirring and storing sounds like a whole bunch of hassle, you could go for the labour-light option: pH monitors. These units give you a constant read-out of the pH in your nutrient solution via a wall-mountable unit - meaning that you can get an accurate pH reading with nothing more than a quick glance.
Of course, having a pH probe permanently submerged in your nutrient solution doesn’t mean you can simply forget about it (which can be easy to do!). Like all pH meters, it will still require regular maintenance. Clean it regularly (once every one to two weeks) under tap water, using a toothbrush to remove any residue and always use two-point calibration to ensure the most accurate readings.
My go-to product in this category is the Bluelab Guardian Monitor Wi-Fi. The latter can communicate with an app on your smartphone so you can monitor your nutrient solution pH on the go, or without even leaving your armchair (I told you this was the labour-light option after all!).
Other pH checks and adjustments
If you measure the pH of your root zone directly using a product like Bluelab’s Soil pH Pen and the reading comes out too high or too low, the easiest way to counter this is to adjust the pH of your feed solution. For example, if your root zone pH measures 6.7, try feeding with a solution pH of 5.8 to 6.0.
Also, don’t forget to check the pH of any run-off from the bottom of containers after an irrigation event. This gives you valuable insight into what’s really going on in your root zone and you can adjust your next feed accordingly. Don’t be in a hurry to correct pH; several small adjustments over seven to 10 days are preferable to a single major adjustment.
EC (Electrical Conductivity)
EC is a measure of the electrical conductivity of your nutrient solution. If you’re a beginner, you might wonder why growers are interested in this. After all, aren’t we supposed to be using the nutrient solution to grow plants rather than passing electricity through it!?
However, it turns out that EC is very useful for growers - especially those using mineral nutrients - as the more dissolved mineral ions (plant food) in your nutrient solution, the more electricity it can conduct. Therefore, we can use EC to infer the concentration of nutrients in our feed solutions and this is really important when it comes to maintaining optimal plant health throughout the lifecycle.
Pure water (ie reverse osmosis water) conducts almost no electricity at all. It has an EC value of zero. A typical hydroponic nutrient solution for vegetative growth is around 0.8 to 1.2 miliSiemens (mS). Full strength flowering feeds vary considerably from species to species, but a sensible target for most applications is 1.8-2.2 mS.
Growers need to measure the EC of their feed solutions both at initial mixing time and during the life of the nutrient; this is especially relevant to hydroponic growers using active recirculating hydroponics systems such as Nutrient Film Technique (NFT) or Deep Water Culture (DWC) where the nutrient solution passes over the plant roots several times.
Remember, many of the ions in a hydroponic nutrient solution are selectively taken up by the plant. This means that on hot, dry days, plants can take up lots of water and relatively few nutrients. Conversely, mature flowering plants during cooler days can be hungrier for nutrients and in need of less water.
Hydroponic growers should check the EC of their nutrient solutions every day and observe any rise or fall. Similarly, growers using soil-less potting mixes and mineral nutrients should make sure they measure both the EC of their feed solution and the leachate - the liquid that runs out of the bottom of the pots. If the EC of the run-off solution is markedly higher than the input (eg you’re feeding an EC of 1.2 mS but the run-off is coming out at 1.8 mS), then this could be a sign that you need to irrigate more regularly and achieve more run-off at each irrigation event.
Note that organic growers don’t really have the luxury of testing for EC at all because organic liquid feeds contain lots of undissolved nutrition. This needs to be broken down by soil microbiology before it becomes ionic and available to the plant. Some organic inputs, like bat guano, contain a lot of immediately soluble components - it’s for this reason that they should be used with care!
EC testing options
The cheapest way to get started measuring EC is to buy a handheld EC pen-style meter. Similar to the pH pens, they start at around $15 and are comprised of two electrodes and an LCD read-out screen. Sometimes EC meters are sold as TDS meters and give a read-out in parts per million (PPM) rather than electrical conductivity (milliSiemens/microSiemens), but TDS meters are just EC meters in disguise! They simply use a multiplication factor to convert from milliSiemens into parts per million.
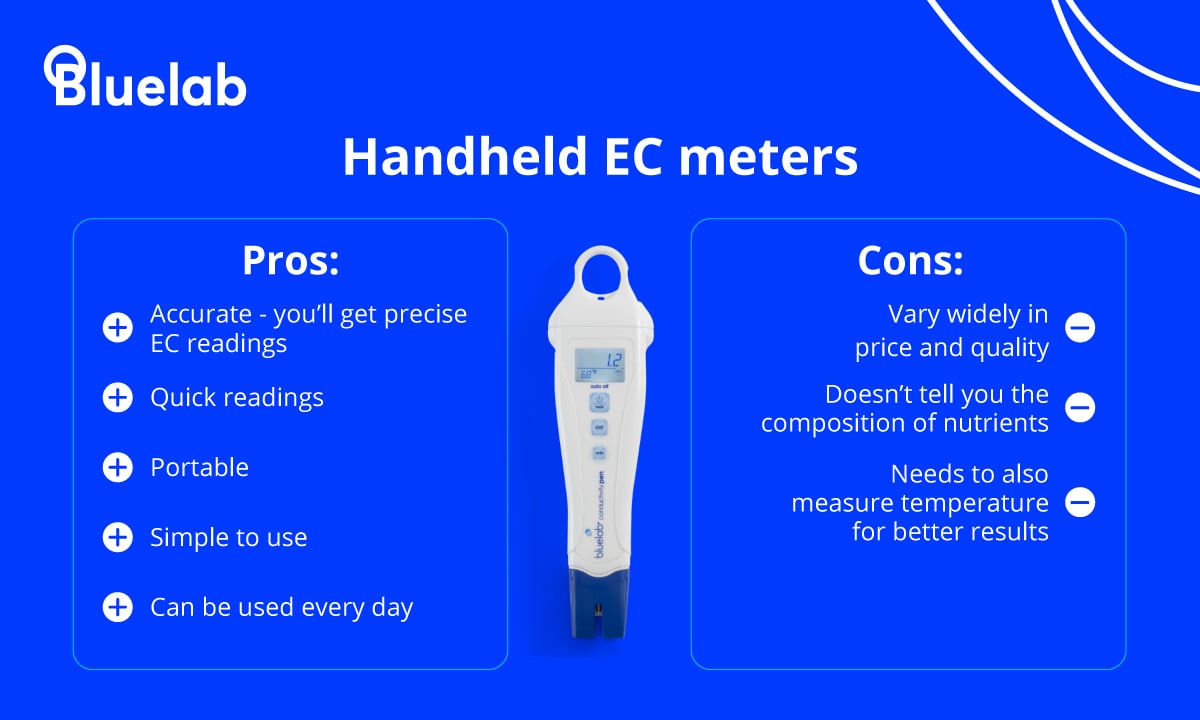
If you can afford the extra investment, a professional conductivity pen that can measure in your preferred units is the way to go. The Bluelab Conductivity Pen is fully waterproof and boasts a backlit screen. Another nice feature is that it automatically compensates for the temperature of your nutrient solution, as higher temperatures can increase conductivity.
However, the quickest and most convenient solution would be something like the Bluelab Guardian Monitor Wi-Fi. This has an EC probe permanently submerged in your nutrient solution, giving you a constant reading, either via the wall-mounted unit or, in the case of the Guardian Monitor Connect, also via your smartphone.
Whichever EC meter you end up choosing, make sure that you clean your conductivity probes at least once a week, especially if they’re kept submerged in the nutrient solution. That's because sediment can form between the two electrodes, resulting in high readings that could lead to you underfeeding your plants.
Temperature testing options
The temperature of your nutrient solution or irrigation water should ideally be around 18 – 22°C (65 - 72°F). Any warmer than this and you risk starving your plants’ roots of oxygen as warm water cannot hold as much dissolved oxygen as cold water. However, water that is too cold will shock the roots, lower plant metabolic rates and stunt growth.
The cheapest option for temperature control? Your hand! Your nutrient solution should feel tepid - neither warm nor cold - and kind of silky to the touch.
Beyond that, quality pH and EC meters (like the ones I’ve already mentioned) have a built-in thermometer, meaning that you won’t need to buy a separate liquid thermometer.
Other things to test?
There are always more meters! With an ion meter, you can measure the concentrations of specific ions such as chlorine, sodium, calcium and nitrates, but these meters are costly and are usually beyond the scope of what a beginner needs to keep track of.
Similarly, dissolved oxygen meters are available but, in my experience, the consumer-grade meters are unreliable and expensive - not a great combination!
My advice? Stick to regularly measuring the holy trinity of pH, EC and temperature, and you won’t go far wrong!
Featured products:
Bluelab pH Pen
Bluelab Conductivity Pen
Bluelab Soil pH Pen
Bluelab Guardian Monitor Wi-Fi
NEW! Bluelab pH and Conductivity Starter Pack

Submit a comment